ResRequest Support
  • Home
  • Modules
    • Central Reservations
    • Channel Management
    • Customer Relationship Management
    • Business Intelligence
    • Property Management
    • Financial Management
  • Latest News
    • Webinars
    • Coffee Chats
    • Professional Services
    • Product Releases
    • Technical Alerts
  • For System Administrators
    • Developer
    • System Setup
    • Technical Tips
  • Add-On Products
    • ResConnect
    • ResNova
    • ResInsite
  • Product
    • ResRequest Enterprise
    • ResConnect
  • Contact Us
  • Menu Menu

Room allocation

  • Our Modern Rooming Calendar is here!

    Hooray! Our new responsive calendar is here!

    The Classic Rooming Calendar is being phased out soon. Tutorials will be replaced with our new, responsive Modern Rooming Calendar, already available in ver 7.30. For more information on the Modern Calendar visit our web page or contact our support team and we will give you a grand tour!

    N.B The Classic Rooming calendar will be deprecated by January 2021.

Room allocation

Room allocation is simply the allocation of rooms to guests so you know how many and exactly which rooms will be occupied by different guests. Room allocation is a basic concept but a vital process necessary to avoid mishaps in the lodge. It becomes essential when the lodge becomes busier and you have back-to-back occupancies.

Why allocate a room?

  • Avoid guests needing to change rooms during their stay.
  • Allocate special requests, e.g. A repeat anniversary couple may request, “The same room as last year please!”.
  • Recording transactions manually to a debtor’s name is easy if a guest name is allocated to a room.
  • Interfaces – if you have interfaced to a POS or telephone system the charge is recorded on a room number.

Rooming can be done at the time of booking by the reservations manager at a reservations level, see the Rooming tutorial in the Central Reservations module, or it can be done at a later stage by the property. The lodge staff would naturally use the Rooming Calendar to allocate rooms.

Rooming from the Rooming Calendar

To allocate rooms navigate through Property > Rooming Calendar.

  • Set the relevant filters and generate the calendar
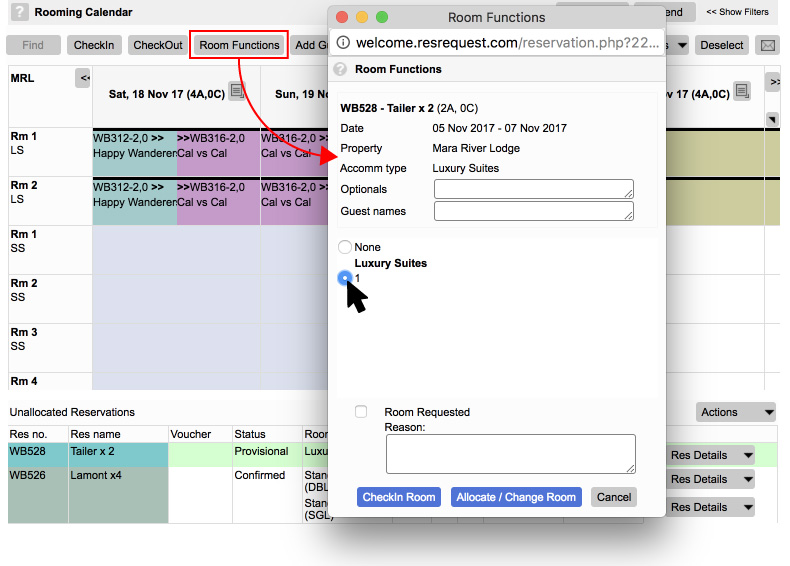
  • Click on the reservation row in the ‘Unallocated reservations’ (the row will go green).
  • Click on the ‘Room functions’ button (or press Ctrl F4)
  • Use the content details at the top of this pop-up to select a suitable/ most appropriate room.
  • Select the room(s) you want to allocate and select ‘Allocate/Change room’.
Room allocation

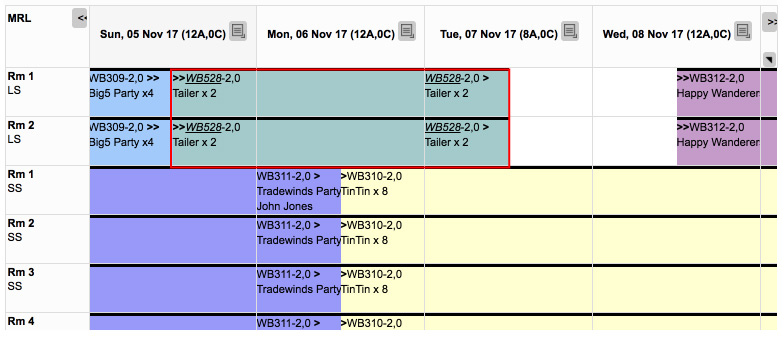
Once roomed the booking will then move from the ‘Unallocated Reservations’ list to the calendar in the row of the selected room.

Room configurations

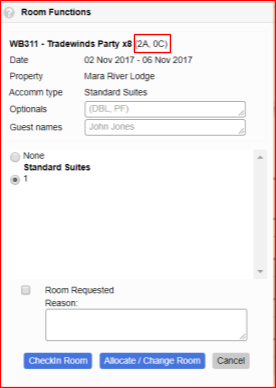
The Room Function’s pop up will show you the pax amount and if there are adults or children staying in the room, e.g. (2A, 0C) alongside the booking name. This will assist your staff with ensuring the guest stays in a suitable or more appropriate room, e.g. double bed for a couple or twin beds for an adult and child staying together. If you have set up bed configurations (twin or double) as Rate components then this will also reflect in the popup under ‘Optionals’. This is an additional step to ensure your guests stay in the right room.

Changing rooms

Guests may request a different room after already being roomed or perhaps you have to shuffle your guests around to accommodate new bookings. Changing rooms is very simple.

  • Select the reservation from the calendar portion and click on ‘Room functions’
  • Choose the room more suitable to the guest. (Also see our guide on upgrading rooms)
  • Select a new room and select the ‘Allocate/Change room’ button.

Upgrading rooms

Guests may request a room upgrade after making their booking or it may be something you choose to offer a guest. There are various ways to do room upgrades in ResRequest including upgrades at no charge and for an extra charge. You will need to decide on a upgrade policy that works best for your team and must always ensure that your room type revenue reflects correctly for reporting purposes.

  1. Upgrade at no extra charge

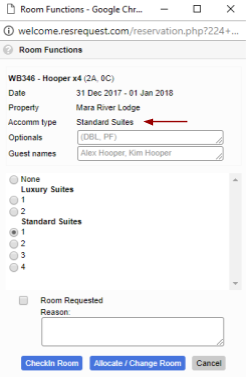
When allocating a room to a booking using the ‘Room Functions’ pop up, it will reflect the itinerary line details including the room type, e.g. Standard suites. Other vacant room types will also be reflected here giving you the option to select a room type that is not in line with the reservation.

Room type on a booking when rooming

The specific room type has been booked as is reflected in the Reservation Itinerary Summary, e.g. Standard suites in the Accommodation column.

Room type on a booking itinerary

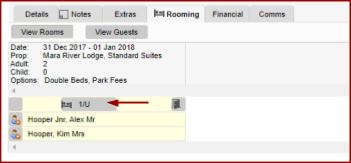
Select the room you are choosing to upgrade to in the Room Functions pop up, e.g. instead of selecting the Standard suite as reflected on the reservation, select the Luxury suite. Rooming a guest in a room not reflected on the reservation itinerary line is considered an upgrade.This is also reflected on the Rooming tab as shown below.

Upgraded room on Rooming tab

Track these upgrades through the Room Discrepancy report which identifies the bookings with different rooming details on the itinerary line and rooming calendar.

Room discrepancy report

By upgrading this way, it is very important to remember that:

  • Stock availability and revenue only change when an itinerary line is changed, not when a reservation is roomed so the stock and revenue reflecting for the itinerary room type will be misleading and will affect your report results.
  • If you would like the stock and revenue to reflect on the upgraded room, you will need to delete the existing itinerary line, e.g. standard suites, then add an itinerary line for the room type to which you are upgrading the guest, e.g. luxury suite, and override the rate to the original amount quoted for the old room, e.g. standard suite.

    NOTE: We recommend that you make a record of this change in the Reservation internal notes so the rest of your team are aware of the change.

  1. Upgrading with an extra charge

If your guest is happy to pay the extra charge to stay in a more expensive suite that you have available, then you can change the reservation Itinerary line to reflect the upgraded room.

  • From the rooming calendar, select the reservation (it will highlight in green), click on ‘Go to Reservations’.
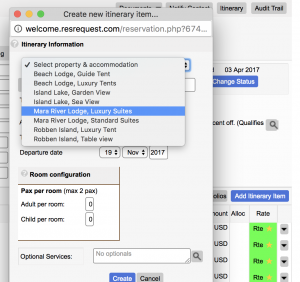
  • On the Details tab of the reservation, go to the Itinerary summary. Click on the ‘Add Itinerary item’ button to add a new itinerary line, select all the same details as the existing itinerary item except select the new room type, e.g. luxury suite.
Upgrade room type
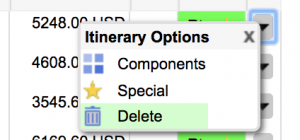
  • Delete the itinerary line that you are replacing by selecting the dropdown arrow to the right of the itinerary.
Delete an itinerary

By upgrading this way, it is important to remember the following:

  • Stock availability will reflect correctly on your availability calendar.
  • Remember to check that the financials are correct after making any changes to the booking as the cost of the newly selected accommodation type should apply.
  • Itinerary lines added from another environment (other than the Property server) cannot be edited on a Property server e.g. RS or WB. You will need to communicate with your reservations office to make these changes.

Using the Ops chart to help with room allocations

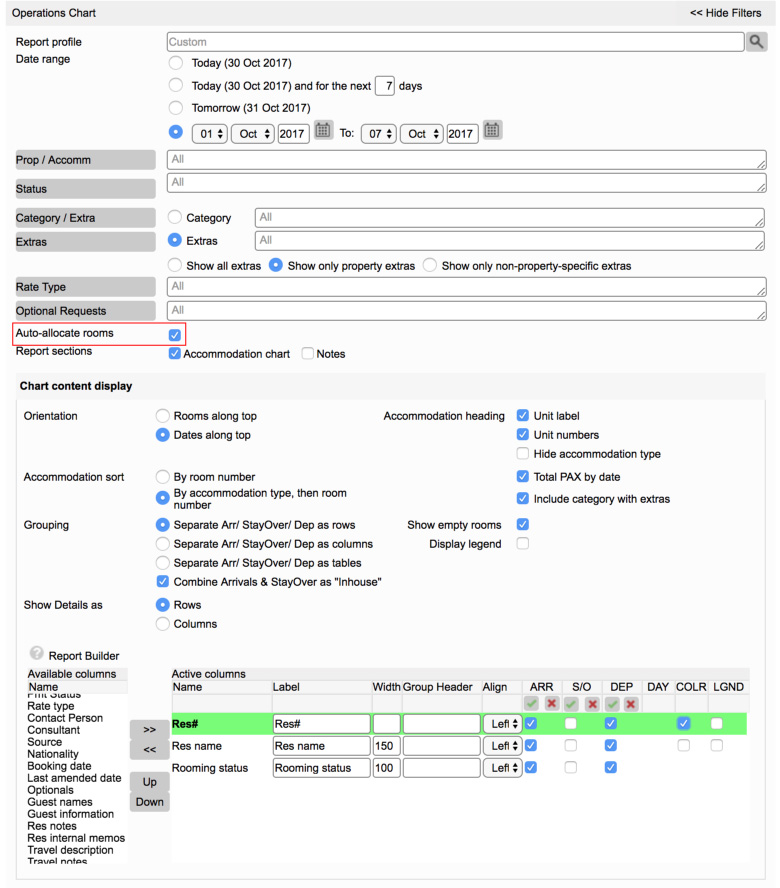
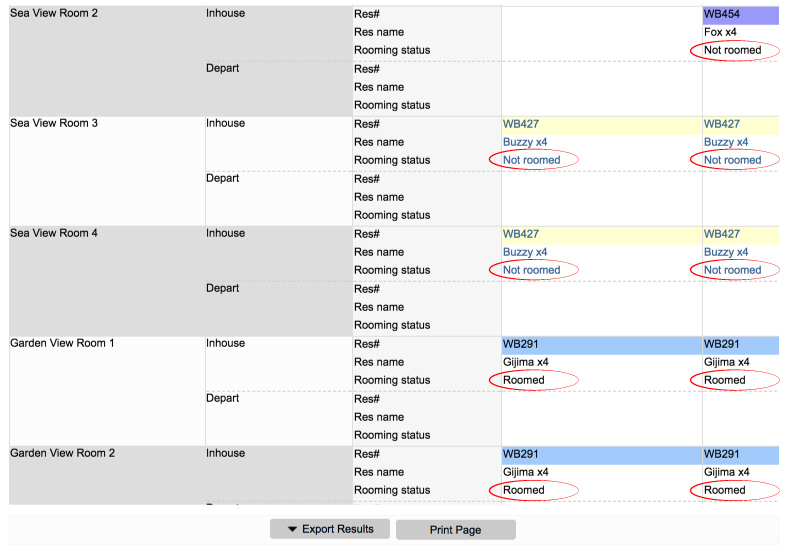
The Ops chart report (Property > Reports > Operations Chart) can assist you with rooming as it has an auto allocate function. In the report you may select the ‘Auto-allocate rooms’ option which means bookings that have not yet been allocated a room will be put into available rooms as the system sees fit. This may be used as a guide, but not as a function, for your own rooming. Remember, the report does not actually room the reservation and merely offers a suggested rooming solution. You will still have to room the bookings separately after running this report.

Using the example filters above, a report is simple to generate as a guide to room your guests. Remember to select the ‘Auto-allocate rooms’ option

Here’s an example of a report which shows roomed and recommendations for the unroomed reservations.

Ops chart room allocation report

See the Reports for the Week tutorial for more information on the Ops Chart.

PROPERTY MANAGEMENT

Getting started

  • The Modern Rooming Calendar
  • Understanding property management
  • Important things to know about your property server
  • The property management process
  • High traffic areas in property management
  • Classic Rooming Calendar

Transfers

  • Tracking arrivals and departures
  • Tracking transfers on the rooming calendar

Room management

  • Room allocation
  • Room check in
  • Recording guest details
  • Room check out

Managing the guest experience

  • Guest Services
  • Guest profiling
  • Guest registration form
  • Housekeeping
  • Kitchen team
  • Activity planning

Accounts

  • Sales
  • Payments
  • Cash up
  • Settle accounts on check out

Interfaces

  • POS Mapping
  • Using interfaces on a property server
  • Use a Point of Sale system
  • Use a Telephone management system
  • Accept credit card payments

Reports

  • Weekly reports

Keep up to date with us

Subscribe to our blog
Atta Logo    Satsa

Menu

  • Home
  • Product Releases
  • Contact Us
  • Technical Alerts
  • Coffee Chats
  • Webinars
  • Professional Services
  • Email Series 2022
  • Webinars Index
  • Email Series 2023

Privacy policy
Terms of use
Fair use policy

Visit our website

ResRequest website

ResRequest Modules

  • Business Intelligence
  • Central Reservations
  • Channel Management
  • Customer Relationship Management
  • Developer
  • Email Series 2022
  • Email Series 2023
  • Financial Management
  • Marketing tools
  • Payment Gateways
  • Point of sale
  • Product
  • Professional Services
  • Property Management
  • ResConnect
  • ResInsite
  • ResNova
  • System Setup
  • Technical Alerts
  • Technical Tips
  • Telephone Management
  • Webinars Index
© Copyright - ResRequest Support - Enfold WordPress Theme by Kriesi
Guest profilingAccept credit card payments
Scroll to top

This site uses cookies. By continuing to browse the site, you are agreeing to our use of cookies.

Accept settingsView SettingsIgnore

Cookie and Privacy Settings


How we use cookies

We may request cookies to be set on your device. We use cookies to let us know when you visit our websites, how you interact with us, to enrich your user experience, and to customize your relationship with our website.

Click on the different category headings to find out more. You can also change some of your preferences. Note that blocking some types of cookies may impact your experience on our websites and the services we are able to offer.

Essential Website Cookies

These cookies are strictly necessary to provide you with services available through our website and to use some of its features.

Because these cookies are strictly necessary to deliver the website, refusing them will have impact how our site functions. You always can block or delete cookies by changing your browser settings and force blocking all cookies on this website. But this will always prompt you to accept/refuse cookies when revisiting our site.

We fully respect if you want to refuse cookies but to avoid asking you again and again kindly allow us to store a cookie for that. You are free to opt out any time or opt in for other cookies to get a better experience. If you refuse cookies we will remove all set cookies in our domain.

We provide you with a list of stored cookies on your computer in our domain so you can check what we stored. Due to security reasons we are not able to show or modify cookies from other domains. You can check these in your browser security settings.

Other external services

We also use different external services like Google Webfonts, Google Maps, and external Video providers. Since these providers may collect personal data like your IP address we allow you to block them here. Please be aware that this might heavily reduce the functionality and appearance of our site. Changes will take effect once you reload the page.

Google Webfont Settings:

Google Map Settings:

Google reCaptcha Settings:

Vimeo and Youtube video embeds:

Accept settingsClose