ResRequest Support
  • Home
  • Modules
    • Central Reservations
    • Channel Management
    • Customer Relationship Management
    • Business Intelligence
    • Property Management
    • Financial Management
  • Latest News
    • Webinars
    • Coffee Chats
    • Professional Services
    • Product Releases
    • Technical Alerts
  • For System Administrators
    • Developer
    • System Setup
    • Technical Tips
  • Add-On Products
    • ResConnect
    • ResNova
    • ResInsite
  • Product
    • ResRequest Enterprise
    • ResConnect
  • Contact Us
  • Menu Menu

Guest registration form

  • Our Modern Rooming Calendar is here!

    Hooray! Our new responsive calendar is here!

    The Classic Rooming Calendar is being phased out soon. Tutorials will be replaced with our new, responsive Modern Rooming Calendar, already available in ver 7.30. For more information on the Modern Calendar visit our web page or contact our support team and we will give you a grand tour!

    N.B The Classic Rooming calendar will be deprecated by January 2021.

Guest registration form

Guest registration forms have become the norm in the tourism industry and makes gathering guest information that much easier. With the mail merge process, you can use ResRequest to create a batch of personalized guest registration or indemnity forms to have ready for your guest when they walk in the door. Each form can include both standard and custom content. You can choose, for example, to greet each recipient by their first name, use their formal name, or add unique information like a membership number. All the information you use to customize the form is taken from entries in your data source, which will be drawn simply by running a quick report profile.

After deciding what guest information is important to your business and what relevant questions you need to ask your guest, e.g. food allergies, customise your Guest Profile using the GRM code tables so that you can record this information in ResRequest.


  • Setting up a Mail Merge Template (For PC users)
  • Setting up a Mail Merge Template (For Mac users)

Creating registration forms

Create the registration form template in Microsoft Word with your company logo and incorporate fields from your Guest Profile such as medical aid insurance details and dietary preferences. Then use the mail merge functionality to carry across guest information already saved in ResRequest to your registration forms.

Setting up a Mail Merge Template (For PC users)

Including static information into your mail merge, e.g. guest name, medical aid insurance details or dietary preferences, means your guest can check that the information that you have saved is correct.

Here is an example of a typical registration form template that a guest would complete on arrival. Using the mail merge will ensure that some of these fields will already be populated when the guest receives it.

Registration form in Word

The Guest History report

Once the Word template is set up, navigate to your Guest History report through the menu: Reports > Contacts > Guest History.

Select the following settings:

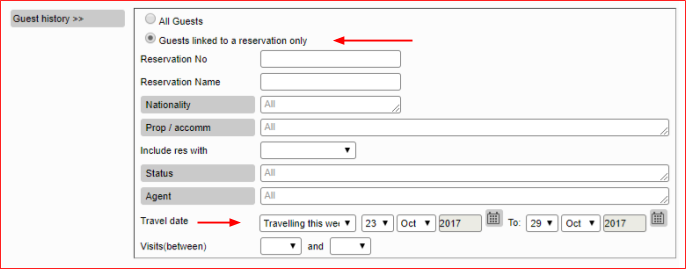
Select the ‘Guest History’ filter to open the options.

  • Select the ‘Guests linked to a reservation only’ option.
  • Here we would suggest setting ‘Travel date’ to reflect all guests coming in the following week so that you have time to prepare before they arrive.
Guest History report_filter options

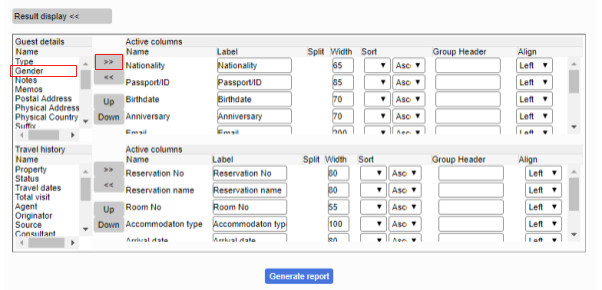
Select the ‘Result display’ filter to open the options.

  • Add the ‘Guest details’ according to the information you require on your registration form. The GRM code table options will also appear here for selection. The fields selected here will be mapped to the fields on the Word document, e.g. if you select ‘Telephone’ number in the report it can be linked to populate the ‘Cell/Tel’ field in the registration template.
    Note: This report automatically generates the guests first name and last name.

    Add fields in the report by simply selecting the options in the box on the extreme left and then clicking on the ‘>>’ arrows to move the item to the field on the right.
Guest History report_filter results display

Note: Save the report settings as a Profile so you can use it in future. See the Profiles and favourites tutorials for directions on how to save profiles.

  • Once you are happy that you have included all the relevant fields, click on ‘Generate report’.
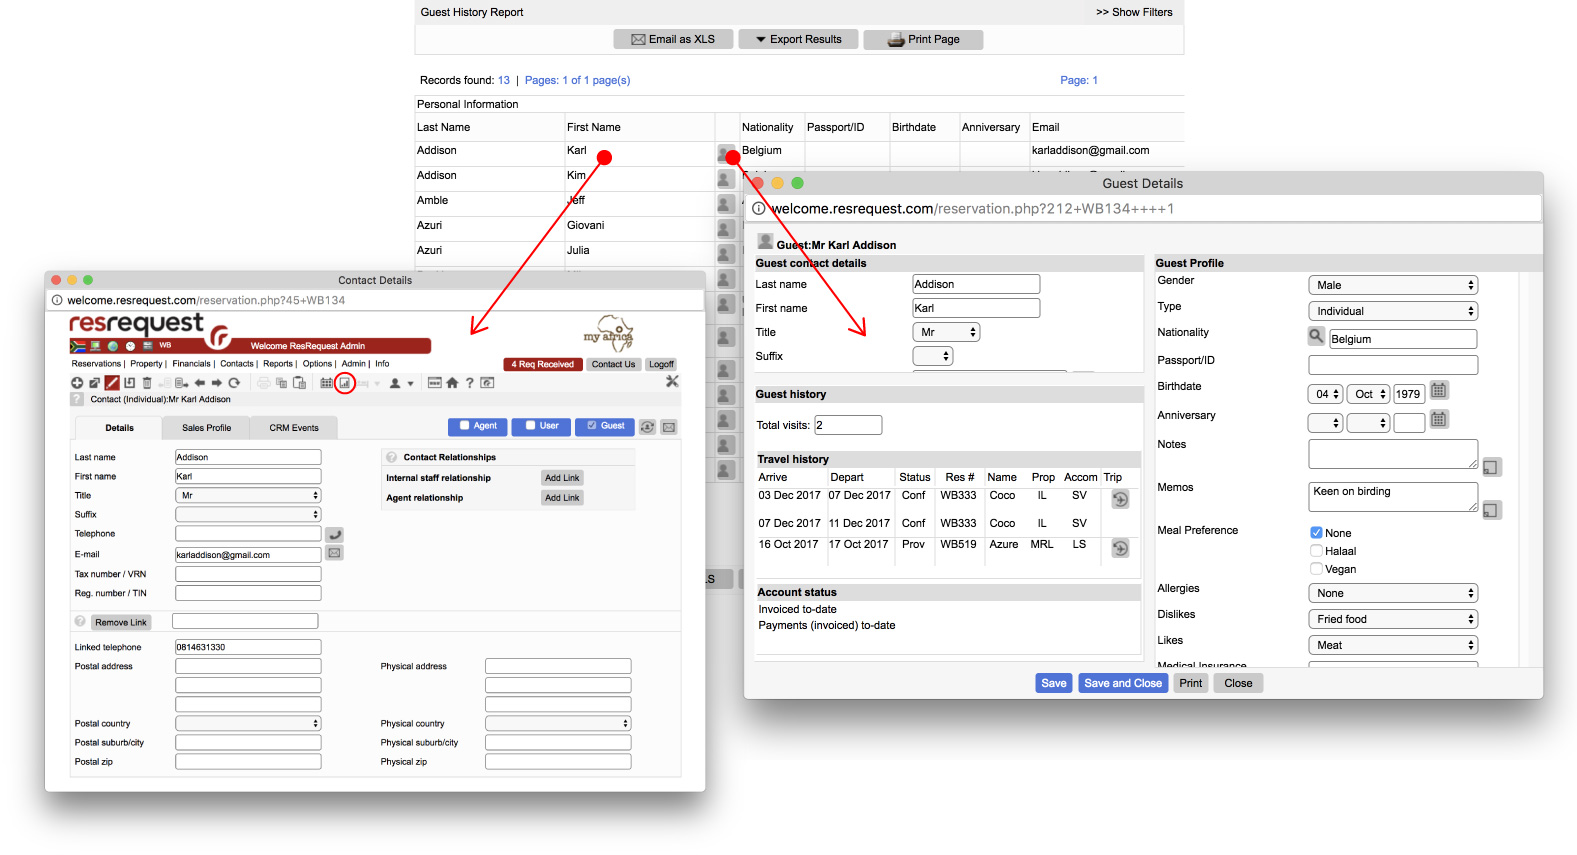
  • At this point, you may click on the icon button to open the Guest Profile or on the name to open the Contact record if you need to add or edit any guest information.

    Note: Use the ‘Back to last report’ button in the toolbar to return to your results.
Guest history report for mail merge
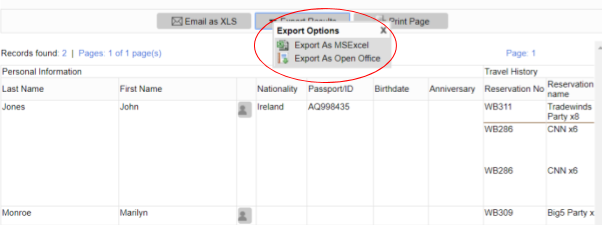
  • Click on the ‘Export Results’ button, export and save the report as an Excel file.
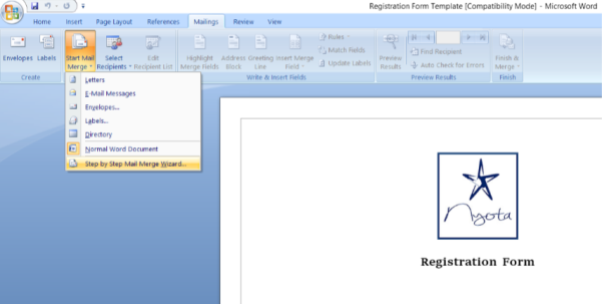
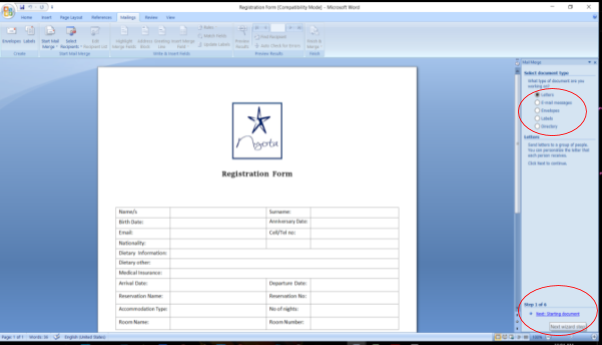
  • Now go back to you registration template on Word and go to: Mailings > Start Mail Merge > Step by step mail merge wizard.
Mail merge from Word step 1

Note: Instructions may vary depending on the software version you have.

  • Select ‘Letters’, then Next > Starting document.
Mail merge from Word starting document
  • Select ‘Use the current document’.
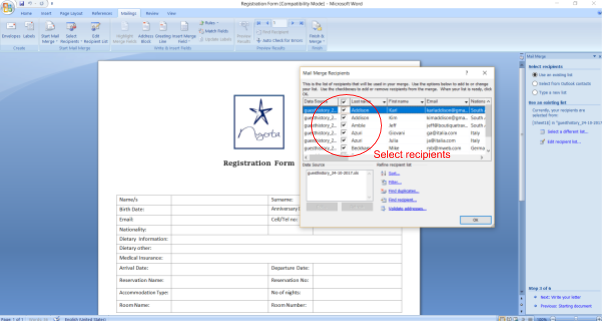
  • Select ‘Next > Select recipients’.
    Use an existing list > select ‘Browse’ > Select the Guest History report Excel file you exported and saved earlier. Opening your file will allow you to refine your recipient list before proceeding.
Mail merge from Word select recipients
  • Select ‘Next > Write your letter’.
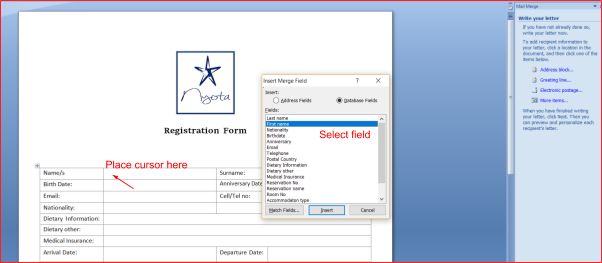
    Place your cursor in a field on the Word template where you require the first item, e.g. ‘Name/s’.
  • Click on ‘More items’. A pop up will appear with database fields to map to the Word document fields.
Mail merge from Word add options
  • Select the desired field from the list, e.g. First name, and ‘Insert’ it into the appropriate field.
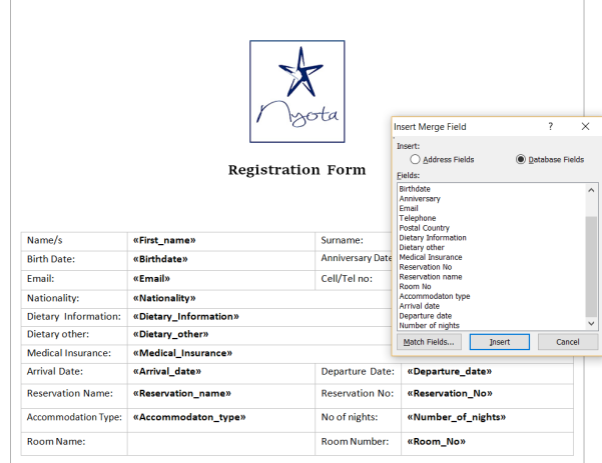
  • Close the pop up and repeat these steps to map the rest of the fields.
Mail merge from Word set all fields

Note: Once you have completed all the relevant fields, choose to save this file as the Guest Registration form Template (File > Save As document). This means you won’t have to remap the fields for the next set of registration forms you want to set up.

  • Select, ‘Next: Preview your letters’.
    Here you can preview all your pre-populated registration forms and add or edit info.
  • To complete the mail merge, select ‘Next: Complete the merge’.
    Select ‘Print’ to print these forms out or select ‘Save as’ and save the documents for guests arriving this week.

Running your Mail merge periodically

Now that you have your Word template and Guest History report profile set up, the next time you run a mail merge will be a breeze.

  • Simply generate the Guest History report profile that you saved (Reports > Contact > Guest History – select the magnifying glass to find the profile) and export the results to an ‘Excel’ format.
Guest History report_export
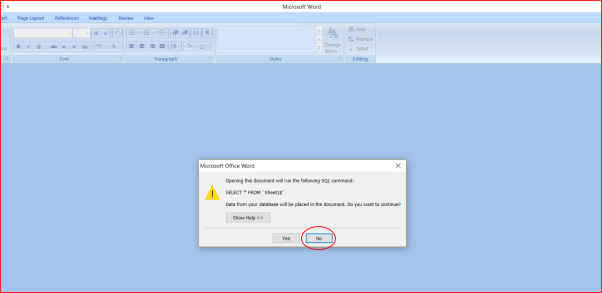
  • Open your registration template in Word. A pop up will appear with the message:
    “Would you like to run the following SQL command”.
  • Select ‘No’. The template will remain linked to the last report that was attached so by selecting ‘No’, you are bypassing this information to populate your document with your new Guest History info.
Mail merge from Word reusing document
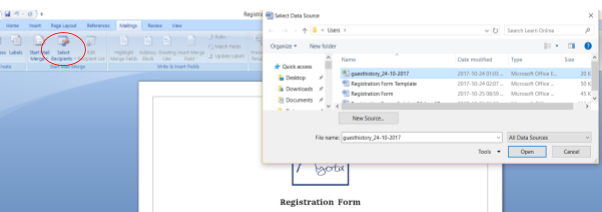
  • Select ‘Mailings > Select Recipients > Use existing list > Select your exported Excel file > Open’.
Mail merge from Word inserting fields from exported report
  • Select ‘Preview Results’.
Mail merge from Word preview results
  • Select ‘Finish & Merge’
    You then have the option to: ‘Edit individual documents’.
    Selecting this option opens a new file that you can save for editing later.
Mail merge from Word finish and merge
  • Save and print the document in readiness for your guests’ arrival.

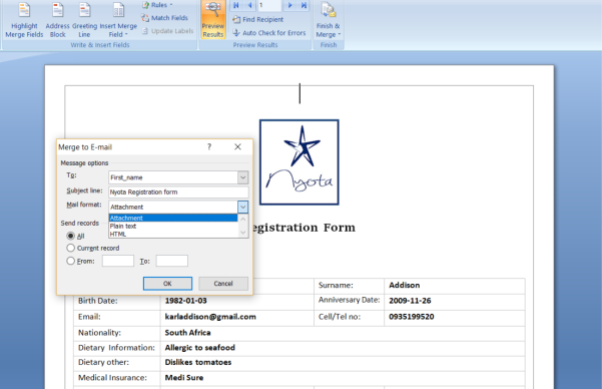
Send Email Messages

Email your registration forms to the email addresses already captured on your guest profiles.

Setting up a Mail Merge Template (For Mac users)

The mail merge process differs whether you use a PC or Mac computer. Watch the following video tutorial for directions on how to do a mail merge on a Mac.

PROPERTY MANAGEMENT

Getting started

  • The Modern Rooming Calendar
  • Understanding property management
  • Important things to know about your property server
  • The property management process
  • High traffic areas in property management
  • Classic Rooming Calendar

Transfers

  • Tracking arrivals and departures
  • Tracking transfers on the rooming calendar

Room management

  • Room allocation
  • Room check in
  • Recording guest details
  • Room check out

Managing the guest experience

  • Guest Services
  • Guest profiling
  • Guest registration form
  • Housekeeping
  • Kitchen team
  • Activity planning

Accounts

  • Sales
  • Payments
  • Cash up
  • Settle accounts on check out

Interfaces

  • POS Mapping
  • Using interfaces on a property server
  • Use a Point of Sale system
  • Use a Telephone management system
  • Accept credit card payments

Reports

  • Weekly reports

Keep up to date with us

Subscribe to our blog
Atta Logo    Satsa

Menu

  • Home
  • Product Releases
  • Contact Us
  • Technical Alerts
  • Coffee Chats
  • Webinars
  • Professional Services
  • Email Series 2022
  • Webinars Index
  • Email Series 2023

Privacy policy
Terms of use
Fair use policy

Visit our website

ResRequest website

ResRequest Modules

  • Business Intelligence
  • Central Reservations
  • Channel Management
  • Customer Relationship Management
  • Developer
  • Email Series 2022
  • Email Series 2023
  • Financial Management
  • Marketing tools
  • Payment Gateways
  • Point of sale
  • Product
  • Professional Services
  • Property Management
  • ResConnect
  • ResInsite
  • ResNova
  • System Setup
  • Technical Alerts
  • Technical Tips
  • Telephone Management
  • Webinars Index
© Copyright - ResRequest Support - Enfold WordPress Theme by Kriesi
HousekeepingGuest profiling
Scroll to top

This site uses cookies. By continuing to browse the site, you are agreeing to our use of cookies.

Accept settingsView SettingsIgnore

Cookie and Privacy Settings


How we use cookies

We may request cookies to be set on your device. We use cookies to let us know when you visit our websites, how you interact with us, to enrich your user experience, and to customize your relationship with our website.

Click on the different category headings to find out more. You can also change some of your preferences. Note that blocking some types of cookies may impact your experience on our websites and the services we are able to offer.

Essential Website Cookies

These cookies are strictly necessary to provide you with services available through our website and to use some of its features.

Because these cookies are strictly necessary to deliver the website, refusing them will have impact how our site functions. You always can block or delete cookies by changing your browser settings and force blocking all cookies on this website. But this will always prompt you to accept/refuse cookies when revisiting our site.

We fully respect if you want to refuse cookies but to avoid asking you again and again kindly allow us to store a cookie for that. You are free to opt out any time or opt in for other cookies to get a better experience. If you refuse cookies we will remove all set cookies in our domain.

We provide you with a list of stored cookies on your computer in our domain so you can check what we stored. Due to security reasons we are not able to show or modify cookies from other domains. You can check these in your browser security settings.

Other external services

We also use different external services like Google Webfonts, Google Maps, and external Video providers. Since these providers may collect personal data like your IP address we allow you to block them here. Please be aware that this might heavily reduce the functionality and appearance of our site. Changes will take effect once you reload the page.

Google Webfont Settings:

Google Map Settings:

Google reCaptcha Settings:

Vimeo and Youtube video embeds:

Accept settingsClose