Working with Automated Workflows
We love saving you time. A great way we can do this is with automated workflows. Automated workflows are automated processes that replace a task or an action that would typically be done manually. With Automated workflows you can activate the task to run automatically in the background, so you don’t have to worry about it.
Automated Workflows can be accessed from the Admin > Setup menu.

TIP!
Users responsible for setting up rules for Automated Workflows need Update or Management permission to access and edit the Automated Workflows Code Table. This permission is managed in User Access module.

General functionality of an Automated Workflow
Navigating Automated Workflows
The Automated Workflow screen is divided into an Edit area at the top and a list of workflows are shown in the bottom area.

Creating an Automated Workflow
Clear the Edit area to start a new workflow. Setup the workflow’s rules according to the options provided and save when the rule has been completed. An Automated Workflow will perform different actions, depending on the Workflow Type.
OPTIONS FOR AUTOMATED WORKFLOWS
| Workflow name | A descriptive name for the workflow. |
| Workflow type | This refers to the task or function that will be performed. Available Workflow types are dependent on your ResRequest version. |
| Description | A field describing the practical function of the workflow in your organisation. |
| Schedule | Schedule rules available will change depending on the Workflow Type. Typically the schedule is the frequency and time that the automated workflow is triggered. |
| On / Off | On means the workflow is running, off stops the workflow from running and triggering respective actions. |


Running an Automated Workflow
An Automated Workflow can be manually triggered by clicking the Run icon ![]() to the right of the listed workflow.
to the right of the listed workflow.
Deleting an Automated Workflow
Click the Delete icon ![]() to permanently remove a workflow.
to permanently remove a workflow.
Editing an Automated Workflow
Click the Edit icon ![]() to the right of the Automated Workflow. This populates the workflow in the edit area at the top of the screen. When the changes are complete, update the workflow.
to the right of the Automated Workflow. This populates the workflow in the edit area at the top of the screen. When the changes are complete, update the workflow.
Workflow Types
Guest check-in reminders
The Check-in reminder automated workflow will automatically send an email to a guest linked to a reservation, at the time defined on this workflow e.g. ‘1 Day prior to Arrival’.
When the workflow runs a Reminder is created on reservations which meet the criteria. Here is a summary of the criteria for the Reminder to be created:
- The reservation must be Confirmed, Provisional or Quotation.
- Guests must be allocated to room groups on the booking.
- Guests must have an email stored on their profile.
- Guests must be a Primary guest.
- The booking must be due to travel today, or up to 7 additional days in the future.
- There is no unsent Check-in already on the booking.
Every 5 minutes the automated workflow scans all reservations to locate reservations that meet the above criteria. To run the automated workflow manually, click the Run icon. Where a reservation meets the above criteria, a ‘Check-in Reminder’ is created on the reservation.
The Reminder’s date and time is determined by the schedule defined on the code table. This means if your Automated Workflow was defined as 08h00, the Reminder will be created and sent at 08h00. If the Automated Workflow date is set to ‘1 day prior to reservation arrival’ the Reminder date will be created as 1 day prior to the booking’s arrival date.
Reminders run at 5 minute intervals. This means if a Reminder is scheduled for 08h03, it would run at 08h05 (or on the 5 minute interval determined by our web server’s clock). This may result in a lag between the time shown on the Reminder versus the time it creates the Reminder on the booking.
Check-in Reminders created on reservations.
The Check-in Reminder is automatically sent to the guest/s as soon as the email scheduler runs. The email is a system-generated format, which can have a customised image and logo and includes a link for the guest to your Online Check-in page.
To find out more about the Online Check-in page visit out Guest Services module.
Provisional expiry reminders
This workflow will send an email to the contact person of a reservation, when the Provisional Expiry date meets the defined frequency, for example, when the expiry date is defined as Send reminder ‘Day before expiry’.
Here is a summary of the criteria for the Reminder to be created:
- The reservation must have a Provisional status.
- The Provisional Expiry date must match the frequency selected.
Automated workflows scan your system every 5 minutes to identify reservations that meet the criteria, and will send the reminder to the recipient.
The Customise Email functionality allows you to control the Subject and Email sent to the reservation’s contact.
Payments due reminders
This workflow will send reminder emails for overdue payments when the overdue date meets the ‘chase’ criteria defined for the workflow. Reminder emails are sent either to the reservation’s Billing Contact or the Debtor listed on a folio or invoice, depending on the associated payment plan.
To work with this automated workflow it is necessary to understand the two types of payment plans associated with a reservation:
- The Reservation’s Payment Plan
This is the official payment plan linked to a reservation when the reservation is created. This payment plan is determined by the agent linked to the reservation (defined on the Agent’s Contact Record), or it is determined by the default payment plan defined on the Default Code Table. This payment plan is automatically created with the reservation but the dates and amounts can be edited by a user. A reservation’s payment plan is located on the reservation’s Financial > Payments tab (shown below).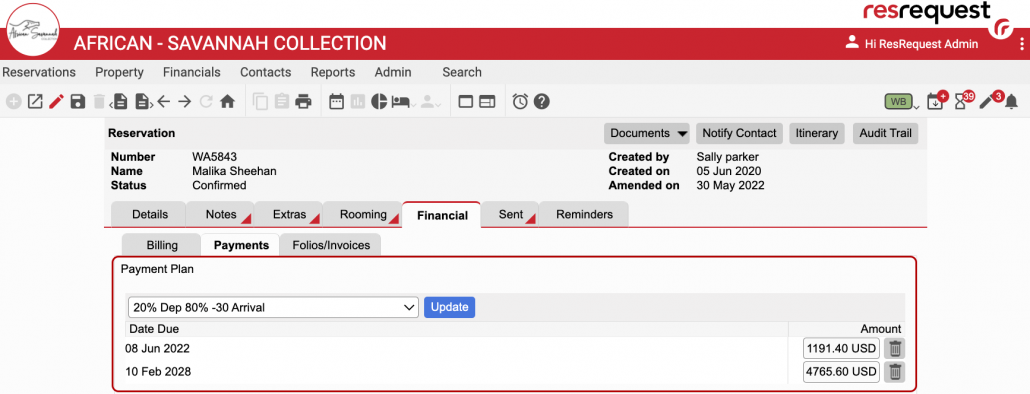
Folios and invoices generated on the environment where the payment plan was created (i.e. where the reservation was originally created) are included in the automated workflow email sent to the reservation’s Billing Contact when a payment is overdue. This automated reminder is sent based on the frequency and filters defined in the Payments Due Automated Workflow.
If there are multiple folios and invoices that meet these criteria, they will all be included in the email sent to the Billing Contact (if the workflow is set up to include the folio / invoice as an attachment). If some of those folios are in different debtor names, they will still be sent to the Billing Contact because the Billing Contact is considered the financial coordinator of the reservation’s Payment Plan.
- Onsite Extras
Folios and invoices created in a different environment from where the payment plan folios and invoices were created are considered and treated as ‘Onsite extras’ which results in them being excluded from the reservation’s payment plan (shown below).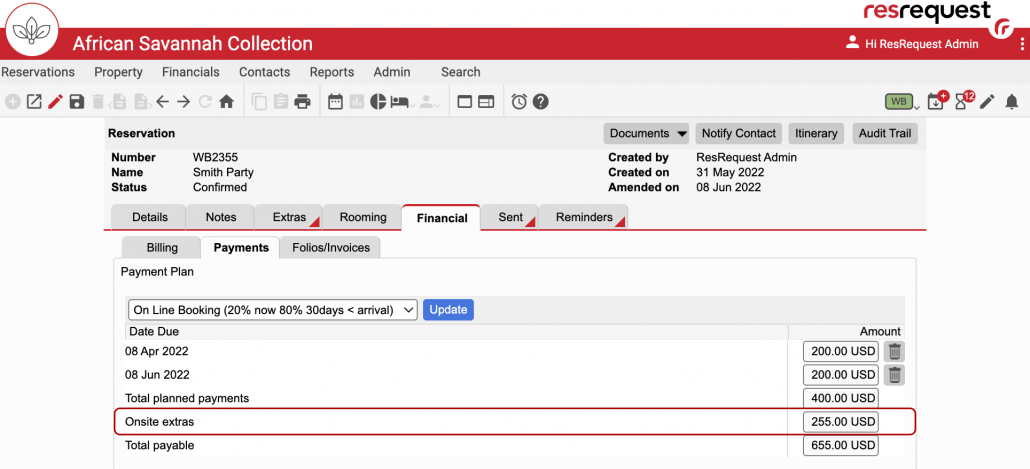
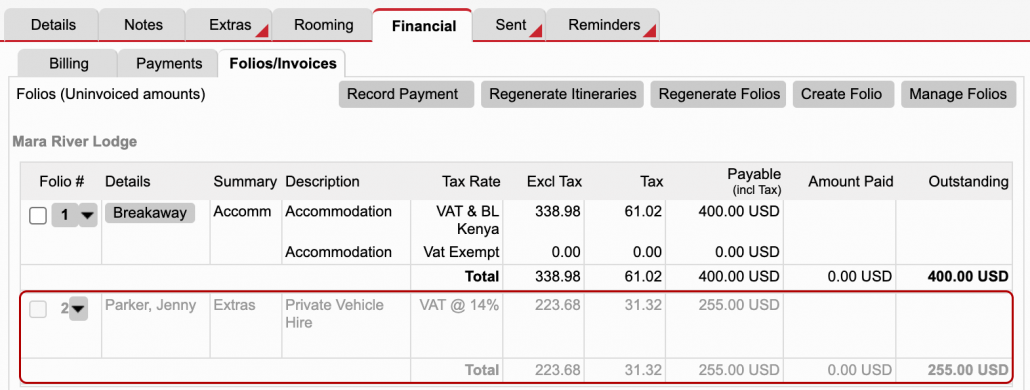
Folios and invoices that are considered ‘Onsite extras’ are due for payment on the reservation itinerary’s last departure date.
The automated reminder is sent to the specific folio or invoice’s debtor. The frequency of this reminder email is based on the frequency and filters defined in the Payments Due Automated Workflow.
Additional criteria required for the automated reminder to be sent are:
- The reservation must have a folio/invoice and associated payment plan or rule.
- The reservation’s Billing Contact must have an email address.
- The guest’s folio/invoice’s debtor must have an email address.
Automated workflows scan your system every 5 minutes to identify folios/invoices that meet the criteria, and will send the reminder to the recipient. The Customise Email functionality allows you to control the Subject and Email sent to the debtor.
Follow the steps outlined in the video below to set up your Payments Due Automated Workflow and watch those payments roll in!