Access groups
User access groups determine the access permissions for users. Once a user group is created, users are linked to the user group which regulates the level of system access available to those users. Different groups should be created for your staff, Agents, public users and online booking channels as different permissions will apply to them. You may also have multiple staff groups, e.g. for junior and senior staffers, for front-of-house staffers at the lodge, for your reservations team and for the management team.
Create or edit user access groups
User access is set up on the user access screen. To access it, navigate to Admin > Setup > User access.
Layout and access options
The User access module works similar to code tables. The module is split into two main areas: the top section is where you will create and edit general permissions for a user group and the bottom section displays a list of defined user groups. The bottom table section includes editing controls like the functions a user group can access.
Take a look at the different sections below.

The area at the top of the module (1) is where general access permissions are defined for the group. All the user groups you have created will be shown in the list, shown above as (2).
To edit the general permissions for a group, select the group from the list (2) to display in the top section (1) for editing. Access to different functions are set in the table shown as (3).Property and accommodation access rights are defined in the section shown as (4) and users are allocated to groups in (5).
Create user groups
To create a new user group:
- Click on the ‘+’ new record button on the toolbar.
- Enter a Group Description, e.g. Administrator, and Code, e.g. Admin. Set the general user access.
- Save by selecting the ‘Save’ button on the toolbar. Once saved, the group will appear in the table.
- Set the access for Functions, Property/accommodation and Users.
Edit user group access
To edit the access controls of a group, click on the group description in the table (2) and it will populate the fields in area (1). This enables you to apply the general access settings in area (1). To edit access controls for Functions, Property and accommodation types or Users, click on the relevant line in the table and a popup relevant to that field will appear, e.g. to edit function access for the Accounts group, hover over the first row in area (3), the row will highlight in green, click on it to open the popup.
General access controls (2)
The settings you apply for the first part of the general access controls are displayed in the table in area (1) of the image above.
- Code: A five character abbreviation of the user group (required field).
- Group Description, A name describing the user group e.g. Administration, Lodge.
- Show allocations:
This determines if available stock is calculated with or without allocations. This is generally used for users with an Agent relationship and for the Public user access group.-
- Use system default: This default setting is the ‘Show allocations shading to external users’ option selected on the System Administer tab of the Defaults screen (Admin > Setup > Defaults).
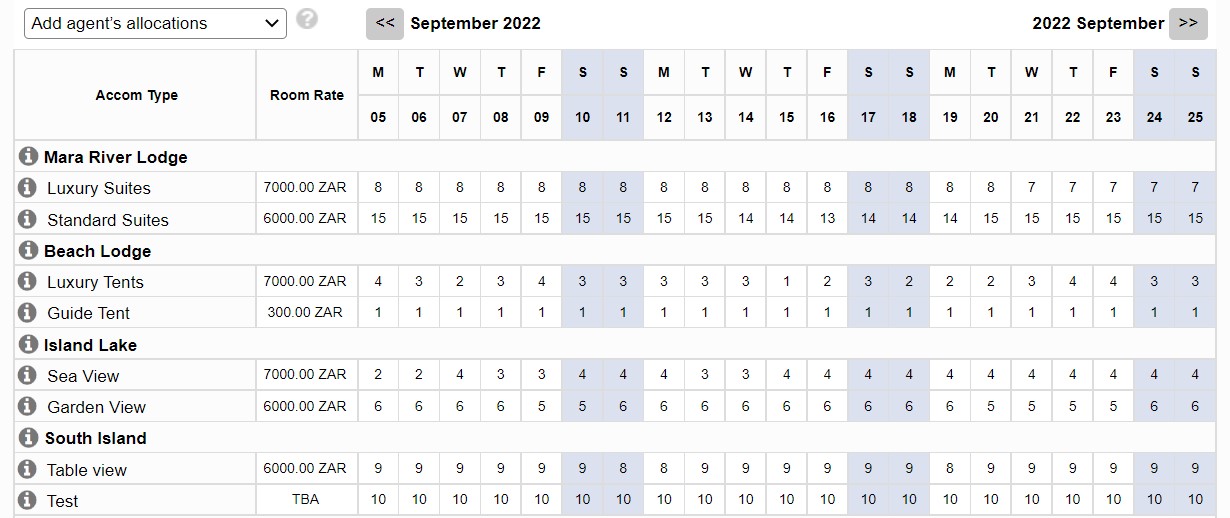
- Yes: Dates with allocations, for that agent, will be highlighted with a handler on the availability calendar when the calendar is set to ‘Add agent’s allocations’. Screen sample:
- No: When Add agent’s allocations are selected on the availability calendar, allocations will not be highlighted on the availability calendar, even if they are present for the agent.
-
- Consultant: Each reservation includes a field for a consultant, which indicates the person responsible for managing the reservation on behalf of your business.
- API: This setting enables the user to access information electronically. This is primarily used for interface partners who have developed an electronic connection to ResRequest. Access is limited by the user access settings and the functionality available in the ResRequest API (Application Programme Interface).
- Archive: If an archive system exists, this option shows the archive button on the toolbar and will give the user access to the archives. To create an archive system contact the ResRequest call centre.
Environment Restrictions
With the functionality of web hosted property servers, it has become necessary to provide the ability to control which environments a user is permitted to access. In most cases any particular user will do all of their work in a single environment, example web only.
Particularly in larger organisations it’s important to have the facility to prevent a user from logging into a different environment, either intentionally or by mistake.
An example of this is a property user who primarily works on the web property server (Px) may also access the web server (WB).
With this user access feature, the property user may be restricted to only the web property (Px) server to ensure only property functions are utilised.
To set up or check this access for your user access groups, simply follow these steps:
-
- Admin > User Access
- Select the user group that you would like to update so that the groups info populates the top of your screen.
- Click on Environment Restrictions
- Set the correct permissions to environments that the user access group requires
- Click on the Save icon to save your changes

When a user does not have access to a particular environment, they will receive a redirect page with indications of where they are allowed to access.

Links to the web and the Reservation server will be indicated if the user has this access i.e. lodgename.resrequest.com.
When access is allowed to web Px servers, the name of the property server will display and the user may click through login i.e. Px.lodgename.resrequest.com.
If a user may only access the offline property server, it is not possible to provide a link. The property name will be provided and a notification will display “This environment is only accessible on the property network”
Examples of the url links shown in the redirect page:
1. Web server (default)and Reservations server – Marariverlodge.resrequest.com
2. Web property server – Px.marariverlodge.resrequest.com
3. Property server – live.resrequest.com (This is specific to the property where the server is hosted).
Tips on working with this function:
1. Web-hosted property servers are accessible from any physical location with an internet connection using the PX. example.resrequest.com URL if a user has this web property access set up in user access > Environment Restrictions
Normal property function restrictions on property web servers will also apply as explained in our Important things to know about your property server guide. Users will not be able to access functions such as rates, user access, defaults, etc.
2. Non-web based property servers may only be accessed from the property where the server is based. This is a physical server that is set up at the property and data transfers will run between the web and property server.
So ensure that when setting up your property users, that they have the correct environment access to process reservations at the property.
3. If an environment is deactivated, it will reflect in greyed out italics and state Deactivated.
The checkbox will be inactive but will retain any settings previously selected. This is to ensure that should the environment be reactivated, that the users will have the relevant access.
Reservation Restrictions
This group of access controls overrides normal system rules within reservation creation and management.
1. Allow reservation detail & itinerary changes at all times – Users may edit bookings and itineraries at any time.
2. Lock reservations _ days (after/before) (arrival date/departure date) – The user is not permitted to edit bookings within a specified number of days before or after the booking arrival or departure.
3. Allow overrides
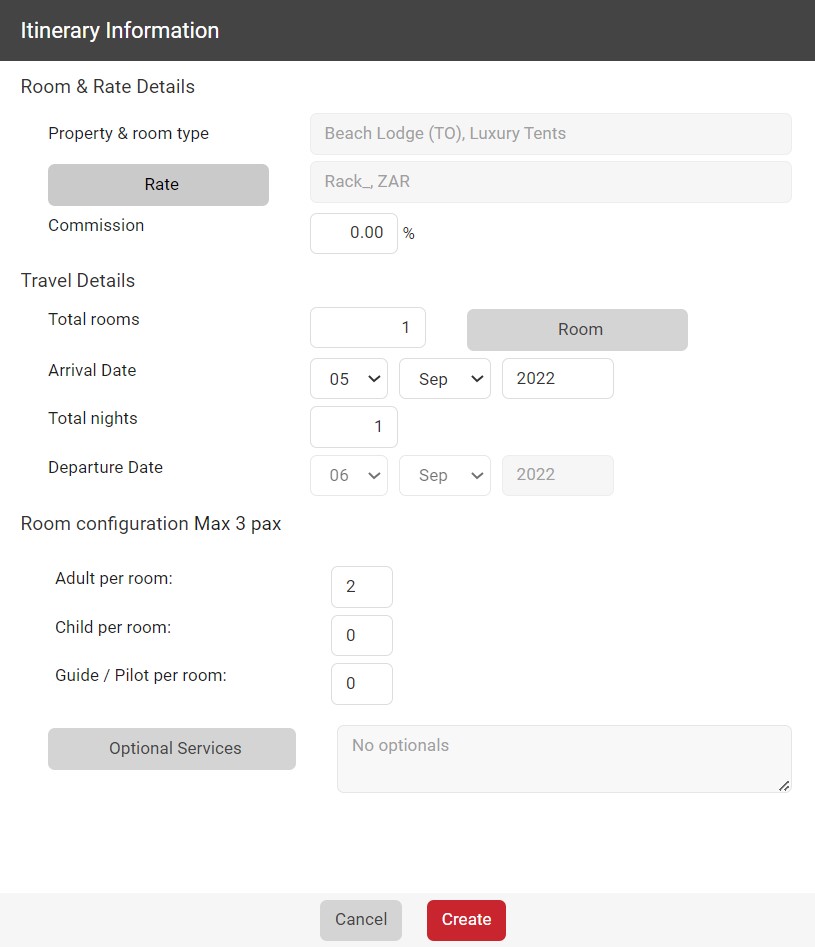
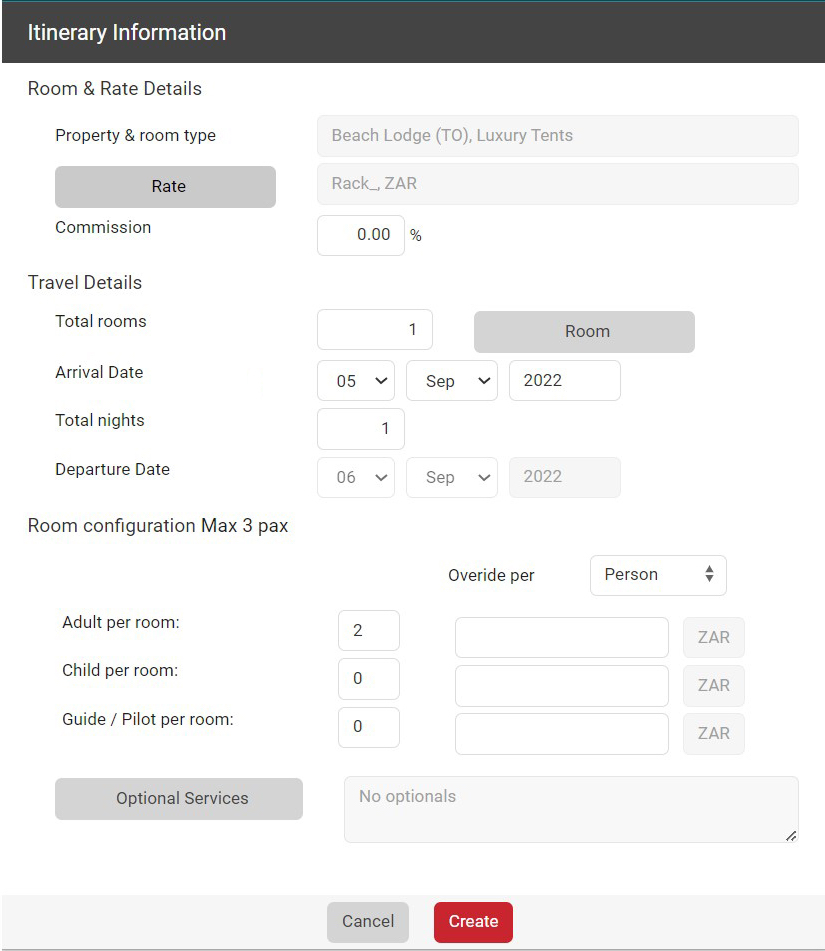
i. Rate type – When set the user can choose a Rate type that is not set up for the agent linked to the booking.
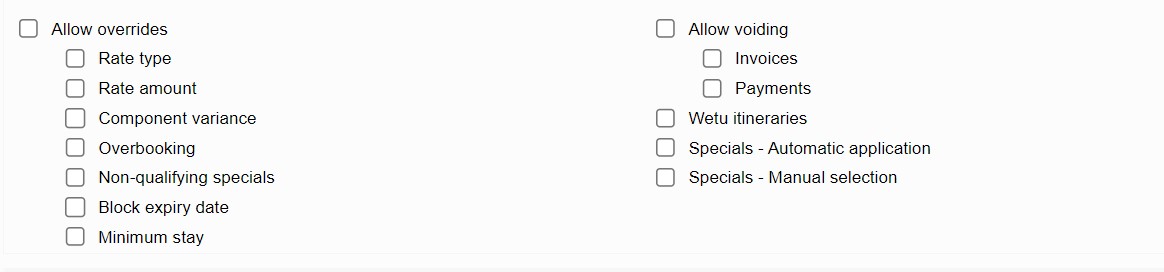
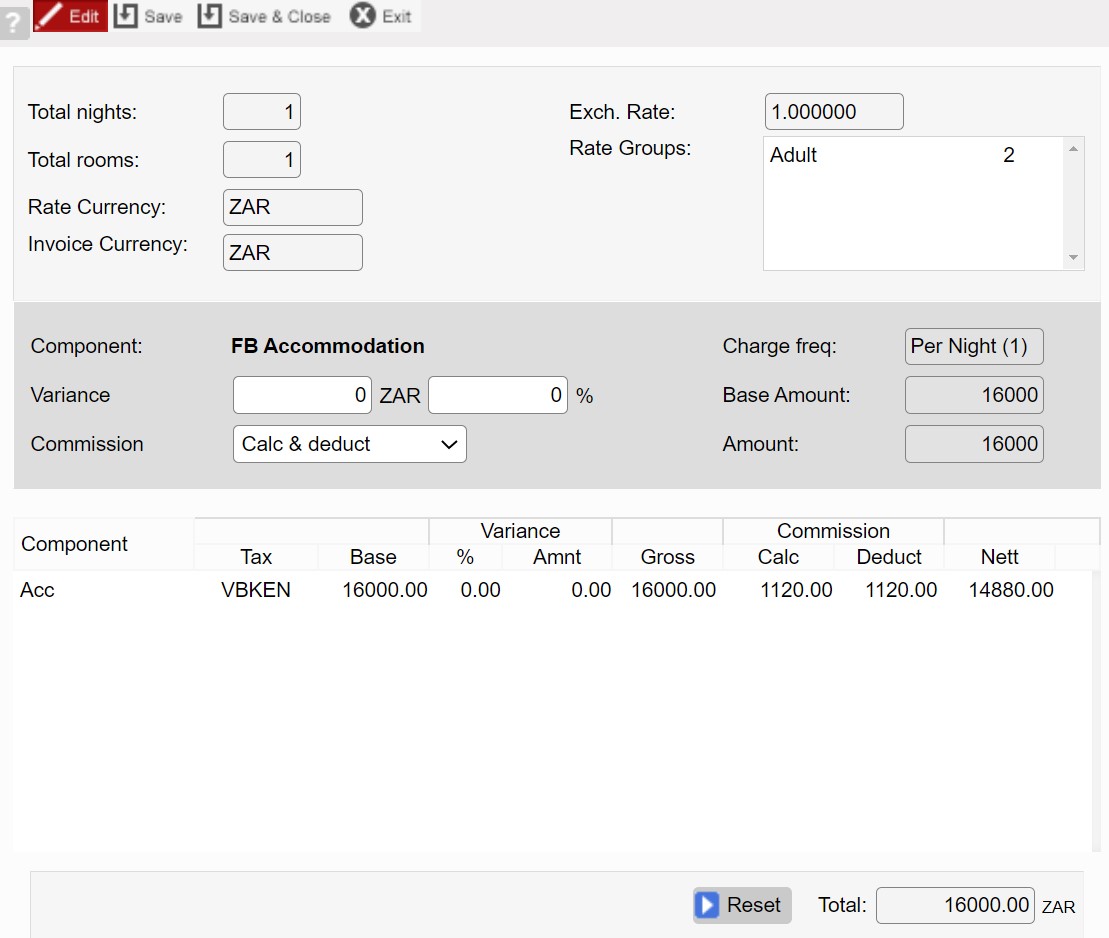
ii. Rate amount – When set the user is able to set a rate amount by entering a manual amount. Override options are determined by the ‘Override level’ defined on the rate type.
| [Below] Itinerary pop up with Rate Amount override not permitted: |
[Below] Itinerary pop up with Rate Amount override permitted: |
|
|
|
An example of Override level options defined on a rate type:

iii. Component variance – When set this option allows a user to adjust rate components of an Itinerary.
iv. Overbooking – When set the user may book more rooms than the actual available number of rooms. This should only be permitted to staff users and should be managed cautiously. This will result in overbookings.
v. Non-qualifying specials – When set the user may apply a Special, for which the reservation does not qualify.
4. Allow status change – Availability is calculated as: Total rooms less the number of rooms that are booked with a stock holding status, less blocked or allocated rooms.
Find further info on types of status here
Some interesting info – Provisional bookings are stock holding as long as the Provisional expiry date has not been reached.
i. Stock-holding to non-stock-holding – User is permitted to change from Provisional and Confirmed (stock-holding status) to any non-stock holding status’, which are: Quotation, Cancelled and Deleted.
ii. Non-stock-holding to stock-holding – User is permitted to change a non-stock holding status (Cancelled, Quotation and Deleted) to any stock-holding status (Provisional and Confirmed).
5. Allow cross invoicing – Extras are linked to a property, this is to help filter the extras list by property when working with reservations. Properties are linked to an invoicing unit. If a property does not share an invoicing unit, users cannot allocate an extra from that property, to a folio in a different invoicing unit.
Allowing cross invoicing lets the user add any Extra, to any property, regardless of the invoicing unit. This is useful if guests purchase extras from a different invoicing unit (for example if they visit a different property), but would like the extra charged to their room account.
6. Allow voiding
Allows voiding of invoices / payments.
i. Invoices
ii. Payments
7. Specials – Automatic application – Allows a Special to be automatically applied to a booking if the booking itinerary details meet the Special criteria. This option is ticked by default.
8. Specials – Manual selection – Enables the user to manually apply a Special to a booking, even if the reservation does not qualify for the special.
Payment gateway
This access control will only be required if you have signed up with a payment gateway and use the credit card payment functionality.
i. Payment forced (available to public and external users only) – Forces a public / external user to pay during the booking process.
Rates
i. Display rates inclusive of Default Optional Rate Components
Selecting this ensures that the rate displayed on the Availability Calendar show the rate amount inclusive of any optional rate components. This option is recommended for public / external users. See our Rate component tutorial to better understand how components work on rates.
Dashboards
This option gives users access to Dashboard worksheets. There are 2 sections which may be granted separate access for Reservations Management and the Sales Overview.
Reservation management
This worksheet includes charts suitable for the Reservation Manager to track productivity in the reservation’s team.
Charts available:
- Consultant bookings by arrival: Consultant workloads based on bookings due to arrive.
- Arrivals without full payment: Payments on confirmed and valid provisional bookings (not expired provisionals) travelling today and in the next six days.
- Arrivals by consultant without full payment: Groups arrivals without payment by consultant.
- New bookings created by consultants: Total number of bookings created this past week (today and for the previous six days), grouped by consultant and status.
- Convertible waitlists: Consultant’s waitlist bookings that can be converted to a stock-holding status i.e. where stock is available.
- Provisionals due to expire: All provisional bookings grouped by consultant that will expire this week, i.e. that will expire today and in the next six days.
- New booking performance bby consultant: Total new bookings created this past week (today and the previous six days), grouped by the user who created the booking and by status.
Function access controls (3)
To see the Function access settings for a user group, hover over the Read-only / Update / Mgmnt row in the table of the relevant user group. It will highlight in green, select it and the ‘Function access’ popup will appear.
To edit, select the levels for Functional access by clicking on the radio button options. Select ‘Save and close’ to save changes.

Access levels
All the system areas are listed here and you may allocate different functional access levels to each area. The different levels enable different access rights:
- None: No access
If a user is not given access to a module, it will be greyed out in the menu:
- Read: View but not edit
- Update: View and edit access
- Management access: View and edit access
On functions that have profiles, e.g. reports, ‘Management’ differs from ‘Update’ in that it enables users to change the level at which a profile is accessible, i.e. by user, environment, global.
Each item in the Functions list and where it is found in ResRequest, is explained below.
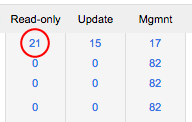
User group table
The numbers in the table indicate the number of selections that have been made for that particular column, e.g. if 21 is reflected under the ‘Read-only’ column of the user group row, you know that from the list of Functions, 21 of them are ‘Read-only’.